Ham Radio Conditions/MUF

We are starting our Rocky Mountain Survival Search and Rescue (RMSSAR) net. We are hoping that you will join us internationally on HF, and locally on 2 Meters. Please contact me, W7WWD, at rmssar@gmail.com for information on times and frequencies.
Showing posts with label Food/Water Storage. Show all posts

Wednesday, June 19, 2013

Top 5 Food Storage Problems and How to Solve Them


Top 5 Food Storage Problems and How to Solve Them
                Having home food storage offers peace of mind and security, but we all know the struggles that tend to come with trying to store lots of food. Read on to find the top 5 food storage struggles and how you can easily overcome them!
1.       Lack of Space. One of the top concerns for people starting to store food is, “Where am I going to put it all?” The answer to this question is to get creative. Look for the places in your home that could be organized more tightly to fit more belongings. Cans are great to store under the beds or tv. There are storage products that you can hang on the backs of closet doors, or you can create a false bottom in a closet by lining the floor with food and topping it with plywood.
2.       Lack of Time. We all wish that we could have more than 24 hours in a day, so how do you find the time to focus on food storage when you have so much already on your plate? Take it a day at a time. When it’s time to cook dinner, think of recipes that could be used for multiple food items, double it, and freeze the other half. Cook things ahead of time for future use so that you end up saving yourself time in the future. Don’t try to take it all on at once. Have one goal per weekend, and learn how to dehydrate fruit, organize, or clear out a space.
3.       Lack of Funds. Saving money is definitely doable when it comes to storing food for your home. Again, don’t try to take on the world all in one shot. Set a monthly budget for yourself (40-50$) and slowly start accumulating the basics of what you need. You don’t necessarily need to buy shelving. If you have 4 large bins of potato pearls or 2 water jugs and you put a piece of plywood across the top of them, you’ve got a shelf to store anything on! If you take a look around at what you have, and don’t assume that you need to buy everything, it will be much cheaper than you would have thought.
4.       Food Rotation Difficulty. Instead of simply placing the food in random places, you’re going to need a system so that the food doesn’t get old. Many get shelving units roll the oldest cans toward the front, so that every time you re-stock you can put them in the back. It can also be as simple as putting new food on the right side and taking from the left when storing in a cupboard or under a bed. What will help the most is learning to cook with the food that you buy so that it doesn’t sit there for years collecting dust and going bad. If you can keep restocking and using the food, you will be able to stay organized and get the most out of your money.
5.       Dietary Restrictions. When you have specific dietary restrictions by choice or allergies, it may make things a little tougher. However, if you do your research, you can still find gluten free food storage or whatever the case may be. The opportunities are there if you do your homework.
Have a positive attitude, and keep striving for food storage, its well worth the struggle.
Author Bio- Dirk Puckett is a food storage junkie who loves to help others on their way to being more prepared for emergencies.


Monday, May 20, 2013

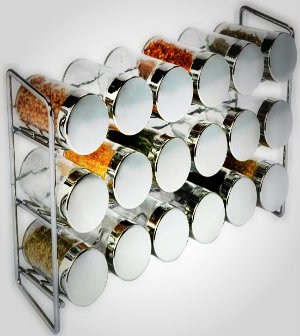
23 Common Spices That Should Be In Your Pantry Now

By on May 16, 2013
5
spicerack
MRE’s, mac and cheese, powdered potatoes, and canned vegetables are going to get really old, really fast after the SHTF.
But if you take a little extra time to include herbs, spices, and seasonings into your supply lists, you can completely change the flavor of otherwise bland meals.
I don’t always follow the rules and tend to be a fan of the “throw it in, how bad could it be” cooking method when it comes to spices.
With many of the prepackaged survival meals on the market, it would be pretty hard to ruin a meal by adding some. (Which in a survival situation you really don’t want to do.)

Common Spices:

  1. Salt
  2. Black Pepper
  3. Crushed Red pepper
  4. Chili Powder
  5. Garlic Powder
  6. Garlic Salt
  7. Minced Garlic (If you can’t tell, I like garlic :) )
  8. Onion Powder
  9. Cinnamon (also great on fruit)
  10. Bay Leaves
  11. Parsley
  12. Oregano

Uncommon Spices:

These mostly include ingredients mentioned above and are way too high in sodium, but they sure can turn bland food into something delicious and take all the guess work out of seasoning.
  1. Meat Spices ( those mixed spice things that are made for grilling) One of my favorites is Montreal Steak Seasoning by McCormicks.
  2. Mrs. Dash
  3. Cajun Seasoning
  4. Chinese 5 spice
  5. pickled peppers ( jalapeno,  banana, and peperoncini are my all time favorites)
  6. Wasabi Powder
  7. Tobasco sauce ( Or my favorite Cholula… goes great on eggs)
  8. Sriracha Sauce
  9. Balsamic Vinegar
  10. Oils ( olive oil is great and can be infused with other flavors for all kinds of uses)
  11. Honey (Not technically a spice, but an unlimited shelf life that can be used to sweeten everything from coffee to baked goods is never a bad thing to have around!)
The Great thing about spices is that they never actually spoil. But over time, spices will lose their potency and not flavor your food as intended and you may need to experiment on how much more spice needs to be added.

As a general rule, whole spices will stay fresh for about 3-4 years, ground spices for about 2-3 years and dried herbs for 1-3 years.

What Else?

What other spices and seasonings would you most want to stock to keep your meals flavorful?
http://www.survivallife.com/2013/05/16/23-common-spices-that-should-be-in-your-pantry-now/

Saturday, March 30, 2013

Purifying Water During an Emergency

Purifying Water During an Emergency

This document was produced in cooperation with the Emergency Management Division of the Washington State Military Department.


The treatments described below work only in situations where the water is unsafe because of the presence of bacteria or viruses. If you suspect the water is unsafe because of chemicals, oils, poisonous substances, sewage or other contaminants, do not use the water for drinking.

Storing water safely

  • Store one gallon of water per person per day.
  • Store at least a three-day supply of water per person.
  • Collect the water from a safe supply.
  • Thoroughly washed plastic containers such as soft drink bottles are best. You can also purchase food-grade plastic buckets or drums.
  • Seal water containers tightly, label with date, and store in a cool, dark place.
  • Replace water every six months.
  • Never reuse a container that contained toxic materials such as pesticides, solvents, chemicals, oil or antifreeze.

Water purification

There are two primary ways to treat water: boiling and adding bleach. If tap water is unsafe because of water contamination (from floods, streams or lakes), boiling is the best method.
  • Cloudy water should be filtered before boiling or adding bleach.
  • Filter water using coffee filters, paper towels, cheese cloth or a cotton plug in a funnel.

Boiling

  • Boiling is the safest way to purify water.
  • Bring the water to a rolling boil for one minute.
  • Let the water cool before drinking.

Purifying by adding liquid chlorine bleach

  • If boiling is not possible, treat water by adding liquid household bleach, such as Clorox or Purex. Household bleach is typically between 5 percent and 6 percent chlorine. Avoid using bleaches that contain perfumes, dyes and other additives. Be sure to read the label.
  • Place the water (filtered, if necessary) in a clean container. Add the amount of bleach according to the table below.
  • Mix thoroughly and allow to stand for at least 30 minutes before using (60 minutes if the water is cloudy or very cold).


Treating Water with a 5-6 Percent Liquid Chlorine Bleach Solution

Volume of Water to be Treated Treating Clear/Cloudy Water:
Bleach Solution to Add
Treating Cloudy, Very Cold, or Surface Water: Bleach Solution to Add
1 quart/1 liter 3 drops 5 drops
1/2 gallon/2 quarts/2 liters 5 drops 10 drops
1 gallon 1/8 teaspoon 1/4 teaspoon
5 gallons  1/2 teaspoon 1 teaspoon
10 gallons 1 teaspoon 2 teaspoons

DOH Pub 821-031
Revised - January 2009

Friday, October 26, 2012


52 Weeks to Preparedness: Week 1, Short Term Emergency Food Supply (List 1)


Create a preparedness foundation that you and your family can rely on when unexpected situations present themselves.

52 Weeks to Preparedness


Week 1 of 52: Short Term Emergency Food Supply (List 1)


FEMA suggests that each family have a 2 week supply of food and water for their home. Starting a food supply does not have to be a budget breaker. By slowly accumulating emergency supplies, you will not feel the financial “burn” compared to having to pay for everything up front. Therefore, keeping in mind what type of emergencies that you are planning for, if there are any family members with medical needs, how long you want your food supply to last, and so on, will help you make the best choice for your family.

Taking time to read the nutritional information on the back of the food source and knowing other considerations, will help a person make the best choices for their needs. If a person needs to use their stashed food supply, having foods high in vitamins, nutrients, and proteins will provide their body with what it needs for needed energy and mental clarity.

Preps to buy:
  • 1 gallon of water per day for each family member (But enough for 2 weeks and remember that having more water stored up is better than being short on your supply)
  • 2 jars of peanut butter
  • 2 cans of juice per family member
  • 2 cans of meat per family member
  • 2 cans of soup or stew for each family member
  • 3 non perishable items such as saltine crackers, graham crackers, etc.
  • 1 hand operated can opener
  • Permanent marker
  • Additional supplies for infants or elderly – 2 weeks worth (diapers, wipes, children’s medication, formula, protein/calorie drinks, prescription medications, extra pair of glasses)
For those who have pets:
1 large container of dry food – This amount should last 2 weeks or longer

Action Items:

  • Date perishable goods with a marker
  • If possible, set aside $20 to use for emergencies
  • Make a disaster plan and decide what types of disasters you are planning for (weather related, natural disasters, economic or personal disasters)
  • Decide upon an out-of-area contact who can coordinate information with friends and family members.
  • Once the out-of-area contact has been decided, email or call the newly designated emergency contact and provide phone numbers and names of family members for them to call


The content of this post was provided by Tess Pennington at
http://readynutrition.com/
__________________

Monday, October 22, 2012

77 Items Sold Out Before You'll Get There

1. WATER
2. batteries
3. flashlights
4. ice
5. candles
6. matches
7. toilet paper
8. paper plates & paper towels
9. heavy duty aluminum foil
10. water filters
11. flour
12. sugar
13. milk
14. powdered milk
15. Gatorade
16. canned soup
17. soup mixes
18. bouillon cubes
19. hand-held can openers
20. dry cereal
21. diapers
22. wet wipes
23. baby food
24. baby formula
25. sanitary napkins & tampons
26. bath soap
27. laundry detergent
28. waterless hand sanitizer
29. disinfectant
30. bleach
31. trash bags
32. re-sealable plastic bags
33. toothpaste
34. toothbrushes
35. shampoo & conditioner
36. shaving equipment
37. lanterns
38. lantern fuel
39. lantern wicks or mantles
40. butane igniter
41. charcoal grills
42. charcoal
43. camp stoves
44. propane for camp stoves
45. pocket knife
46. army knife
47. vitamin supplements
48. antacids
49. antibiotics
50. rubbing alcohol
51. hydrogen peroxide
52. laxative and diarrhea remedies
53. antihistamine
54. epsom salts
55. bandages
56. sterile gauze pads
57. first-aid tape
58. portable toilets
59. 5-gallon plastic buckets
60. gas-driven generators
61. gasoline storage containers
62. duct tape
63. chain-saws
64. cast iron dutch oven
65. cast iron frying pan
66. bug spray
67. mouse traps
68. mouse bait (d-con)
69. thermal underwear
70. insulated coveralls
71. heavy work gloves
72. boots / rain gear
73. band saws
74. axes
75. solar panels
76. hand-crank radios
77. canvas and nylon tarps

Sunday, April 1, 2012

Water Purification: Improvised Charcoal Filter

Water Purification: Improvised Charcoal Filter

(As featured in the May/June 2010 issue of Practically Seeking)
Charcoal Water Filter
"Water water every where and not a drop to drink."
In a survival situation water IS life, and yet so very much of it is potentially contaminated. It is ALWAYS best to assume the ground water is not safe to drink straight from the source, and to take the appropriate actions to purify any water you obtain. The ONLY way to be absolutely sure all potential pathogens in your water have been neutralized is to boil it.

However, the use of an improvised charcoal filter is a great way to remove sediments, remove many potentially harmful contaminants, and to improve taste.

Charcoal is used in many household and back-country water filters, and in my experience with primitive filtration methods, it is also the easiest and most effective method to use in the field.

We are using a 2-liter plastic bottle for the "see through" value, but many other options are available to you, such as a sheet of tree bark rolled into a cone, a clay pot with a small hole in the bottom, a length of bamboo or cane, a glass bottle with the bottom removed (see our YouTube video)…  Besides, these days, sadly, there is almost always plenty of usable refuse out there on the landscape :(

Step-by-step Instructions on How to make an Improvised Charcoal Water Filter:

  1. Obtain FRESH charcoal that has cooled completely. To create a good supply of charcoal, create a camp fire and when you have a good coal bed, bank your fire by covering it with dirt or ash and come back in a day or two. Uncover the charcoal and allow to cool completely before removing. 
  2. Make Charcoal Allow to cool
  3. Crush your charcoal into small bits, from powder up to the size of aquarium gravel.
  4. Charcoal and pounding rock Crushing charcoal Small bits
  5. Obtain or fashion a cylindrical container (taller is better than wider) with open ends. Julie is using a 2-liter soda bottle with the end cut off.
  6. Fashion an open-ended cylinder Soda bottle with end cut off
  7. Fill the smaller opening with tightly-packed grass or a piece of fabric (if both ends are the same diameter choose either one) to prevent the charcoal from falling out or running through with the water. Or if you are using a bottle that still has it's cap, as we are, poke a small hole in the cap before placing your fabric/grass.
  8. Make small hole in cap Pack smaller end with cloth or grass Pack end tightly
  9. Pack the crushed charcoal into the container TIGHTLY.  The idea here is to create as fine a matrix as possible for the water to DRIP through slowly, thus trapping more sediment and "wee beasties". If the water runs rather than drips through the filter, you will need to pack your charcoal tighter. You should have enough crushed charcoal to fill your cylinder up about halfway.
  10. Charcoal into cylinder Pack the charcoal tightly Fill cylinder halfway
  11. It is a good idea to place a couple of inches of packed-down grass or sand, or another piece of cloth on top of the charcoal to prevent it from becoming displaced when you add your water.
  12. Top charcoal with sand Pack sand firmly
  13. Place your filter atop a container to catch your water. We are using a glass jar so you can see the changes easily, but in a wilderness situation it is a good idea to filter directly into the pot you are going to boil the water in rather than the one you will be drinking from (in the event they are not one in the same).
  14. Place filter on top of catch container
  15. Slowly pour the untreated water into your filter (being careful not to displace your sand) filling the remainder of your cylinder with water and allowing it to slowly percolate through. Remember, the water should DRIP SLOWLY out the bottom of your filter.
  16. Water to be filtered Pour water slowly Wait for water to percolate through Drip Slowly
  17. After all of the water has run through the filter, pour it back through as many times as needed to make it clear. I usually run it through at least two, preferably three, times.
  18. Once through the filter Pour through 2 or 3 times Third pass through filter
  19. Once the desired clarity has been achieved, bring water to a boil for a few minutes in order to make sure it is completely sterilized. Remember, boiling is the only way to ensure safety from pathogens. (Taste can be further improved by adding a small lump of charcoal to the boiling water.) Enjoy your clean water!
  20. Bring water to a boil Safe, Clear Water!

Remember, you stake your life on your water source and
contaminated water can cause debilitating effects that can prove fatal in a survival situation!
Never take chances and always use the absolute best filtration methods
available to you under the circumstances.

Until next time, Be Well and Have Fun!


Thursday, March 22, 2012

Ancient Grains - Flax


Brown Flax Seed


Some Facts on Flax (hey, I rhyme!):

  • Flax was being cultivated in the Babylon Empire in 3,000 B.C.
  • Flax seeds are one o the truly perfect foods. They contain high levels of Omega 3 and Omega 6 EFA.
  • The ground flax seed is the Cadillac of soluble and insoluble fiber. This fiber is probably responsible for the cholesterol-lowering effects of flax.
  • Flax seed is about 20% protein with many essential amino acids. It is literally loaded with lignans which are natural cancer-preventative phytonutrients. It is full of vitamins and minerals: folate, vitamin E, vitamin B-6, calcium, copper, zine magnesium and potassium.
  •  Flax is a natural laxative you need to introduce slowly into your diet.
  • You need to drink plenty of water when taking flax because of the high amount of fiber.
  • Flax needs to be ground to get the full effects but can be added to just about anything.
Just a note about grinding and adding flax to food stuffs. I use a little $20 coffee grinder and grind my flax with that so it doesn't oil up my grain grinder. I add it to every loaf of bread I make, in the granola I make, meat loaf, etc. No one even knows I making them healthier!

~Karin

Disclaimer

FAIR USE NOTICE: This site contains copyrighted material the use of which has not always been specifically authorized by the copyright owner. We are making such material available in our efforts to advance understanding of issues regarding health, safety, financial trends, and anything having to do with current and future political, social events etc. We believe this constitutes a 'fair use' of any such copyrighted material as provided for in section 107 of the US Copyright Law. In accordance with Title 17 U.S.C. Section 107, the material on this site is distributed without profit to those who have expressed a prior interest in receiving the included information for research and educational purposes. Notwithstanding the provisions of sections 106 and 106A, the fair use of a copyrighted work, including such use by reproduction in copies or phonorecords or by any other means specified by that section, for purposes such as criticism, comment, news reporting, teaching (including multiple copies for classroom use), scholarship, or research, is not an infringement of copyright. In determining whether the use made of a work in any particular case is a fair use the factors to be considered shall include—

(1) the purpose and character of the use, including whether such use is of a commercial nature or is for nonprofit educational purposes;

(2) the nature of the copyrighted work;

(3) the amount and substantiality of the portion used in relation to the copyrighted work as a whole; and

(4) the effect of the use upon the potential market for or value of the copyrighted work.

The fact that a work is unpublished shall not itself bar a finding of fair use if such finding is made upon consideration of all the above factors.