Ham Radio Conditions/MUF

We are starting our Rocky Mountain Survival Search and Rescue (RMSSAR) net. We are hoping that you will join us internationally on HF, and locally on 2 Meters. Please contact me, W7WWD, at rmssar@gmail.com for information on times and frequencies.
Showing posts with label Emergency Preparedness. Show all posts

Wednesday, May 29, 2013

Recent Advances in Solar Water Pasteurization

Recent Advances in Solar Water Pasteurization
Boiling isn't necessary to kill disease microbes

The main purpose of solar cookers is to change sunlight into heat which is then used to cook foods. We are all familiar with how successful solar cookers are at cooking and baking a wide variety of foods. In this article I want to consider using the heat in solar cookers for purposes other than cooking. My main focus will be solar water pasteurization, which can complement solar cooking and address critical health problems in many developing countries.
The majority of diseases in developing countries today are infectious diseases caused by bacteria, viruses, and other microbes which are shed in human feces and polluted water which people use for drinking or washing. When people drink the live microbes, they can multiply, cause disease, and be shed in feces into water, continuing the cycle of disease transmission.
Worldwide, unsafe water is a major problem. An estimated one billion people do not have access to safe water. It is estimated that diarrheal diseases that result from contaminated water kill about 2 million children and cause about 900 million episodes of illness each year.

Boiling contaminated water

How can infectious microbes in water be killed to make the water safe to drink? In the cities of developed countries this is often guaranteed by chlorination of water after it has been filtered. In developing countries, however, city water systems are less reliable, and water from streams, rivers and some wells may be contaminated with human feces and pose a health threat. For the billion people who do not have safe water to drink, what recommendation do public health officials offer? The only major recommendation is to boil the water, sometimes for up to 10 minutes. It has been known since the time of Louis Pasteur 130 years ago that heat of boiling is very effective at killing all microbes which cause disease in milk and water.
If contaminated water could be made safe for drinking by boiling, why is boiling not uniformly practiced? There seem to be five major reasons: 1) people do not believe in the germ theory of disease, 2) it takes too long, 3) boiled water tastes bad, 4) fuel is often limited or costly, 5) the heat and smoke are unpleasant.
Some examples of the cost of boiling water are worth mentioning. During the cholera outbreak in Peru, the Ministry of Health urged all residents to boil drinking water for 10 minutes. The cost of doing this would amount to 29% of the average poor household income. In Bangladesh, boiling drinking water would take 11% of the income of a family in the lowest quartile. In Jakarta, Indonesia, more than $50 million is spent each year by households for boiling water. It is estimated that in the city of Cebu in the Philippines, population about 900,000, about half the families boil their drinking water, and the proportion is actually higher for families that obtain their water from an unreliable chlorinated piped supply. Because the quantities of fuel consumed for boiling water are so large, approximately 1 kilogram of wood to boil 1 liter of water, and because firewood, coal, and coke are often used for this purpose, an inadequate water supply system significantly contributes to deforestation, urban air pollution, and other energy-related environmental effects.
If wood, charcoal, or dung is used as fuel for boiling water, the smoke creates a health hazard, as it does all the time with cooking. It is estimated that 400 to 700 million people, mainly women, suffer health problems from this indoor air pollution. As a microbiologist, I have always been perplexed as to why boiling is recommended, when this is heat far in excess of that which is necessary to kill infectious microbes in water. I presume the reason boiling is recommended is to make sure that lethal temperatures have been reached, since unless one has a thermometer it is difficult to tell what temperature heated water has reached until a roaring boil is reached. Everyone is familiar with the process of milk pasteurization. This is a heating process which is sufficient to kill the most heat resistant disease causing microbes in milk, such as the bacteria which cause tuberculosis, undulant fever, streptococcal infections and Salmonellosis. What temperatures are used to pasteurize milk? Most milk is pasteurized at 71.7° C (161° F) for only 15 seconds. Alternatively, 30 minutes at 62.8° C (145° F) can also pasteurize milk. Some bacteria are heat resistant and can survive pasteurization, but these bacteria do not cause disease in people. They can, however, spoil the milk, so pasteurized milk is kept refrigerated.
There are some different disease microbes found in water, but they are not unusually heat resistant. The most common causes of water diseases, and their heat sensitivity, are presented in Table 1. The most common causes of acute diarrhea among children in developing countries are the bacteria Escherichia coli and Shigelia SD. and the Rotavirus group of viruses. These are rapidly killed at temperatures of 60° C or greater.

Solar water pasteurization

As water heats in a solar cooker, temperatures of 56° C and above start killing disease-causing microbes. A graduate student of mine, David Ciochetti, investigated this for his master's thesis in 1983, and concluded that heating water to 66° C in a solar cooker will provide enough heat to pasteurize the water and kill all disease causing microbes. The fact that water can be made safe to drink by heating it to this lower temperature—only 66° C—instead of 100° C (boiling) presents a real opportunity for addressing contaminated water in developing countries.

Testing water for fecal contamination

How can one readily determine if the water from a well, pump, stream, etc. is safe to drink? The common procedure is to test the water for bacterial indicators of fecal pollution. There are two groups of indicators which are used. The first is the coliform bacteria which are used as indicators in developed countries where water is chlorinated. Coliform bacteria may come from feces or from plants. Among the coliform bacteria is the second indicator, Escherichia coli. This bacterium is present in large numbers in human feces (approximately 100,000,000 per gram of feces) and that of other mammals. This is the main indicator used if water is not chlorinated. A water source containing 100 E. coli per 100 milliliters poses a substantial risk of disease.
The standard method of testing water for the presence of coliforms and E. coli requires trained personnel and a good laboratory facility or field unit which are usually not present in developing countries. Thus, water supplies are almost never tested.

A new approach to testing in developing countries

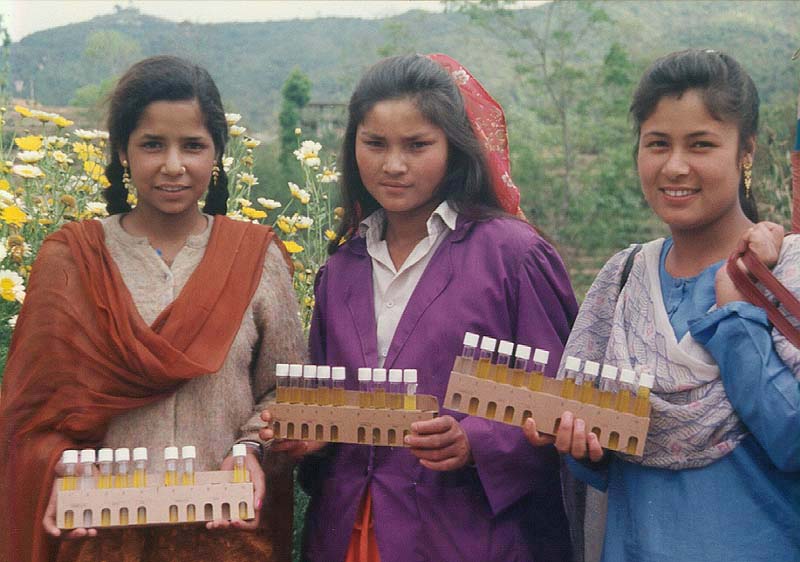
In 1987, the Colilert MPN Test (CLT) was introduced as the first method which used a defined substrate technology to simultaneously detect coliforms and E. coli. The CLT comes as dry chemicals in test tubes containing two indicator nutrients: one for coliforms and one for E. coli. The CLT involves adding 10 ml of water to a tube, shaking to dissolve the chemicals, and incubating at body temperature for 24 hours. I prefer incubating tubes under my belt against my body. At night I sleep on my back and use night clothes to hold the tubes against my body.
If no coliform bacteria are present, the water will remain clear. However, if one or more coliforms are present in the water, after 24 hours their growth will metabolize ONPG and the water will change in color from clear to yellow (resembling urine). If E. coli is among the coliform bacteria present, it will metabolize MUG and the tube will fluoresce blue when a battery-operated, long-wave ultraviolet light shines on it, indicating a serious health hazard. I have invited participants at solar box cooker workshops in Sierra Leone, Mali, Mauritania, and Nepal to test their home water supplies with CLT. One hundred and twenty participants brought in samples. In all four countries, whether the water was from urban or rural areas, the majority of samples contained coliforms, and at least half of these had E. coli present. Bacteriological testing of the ONPG and MUG positive tubes brought back from Mali and Mauritania verified the presence of coliforms/E. coli in approximately 95% of the samples. It is likely that soon the Colilert MPN test will be modified so that the test for E. coli will not require an ultraviolet light, and the tube will turn a different color than yellow if E coli is present. This will make the test less expensive and easier to widely use in developing countries to assess water sources.
Effect of safe water on diarrhea in children

What would be the effect if contaminated water could be made safe for drinking by pasteurization or boiling? One estimate in the Philippines predicts that if families using moderately contaminated wells (100 E. coli per 100 ml) were able to use a high-quality water source, diarrhea among their children would be reduced by over 30%. Thus, if water which caused a MUG (+) test were solar pasteurized so it would be clear, this would help reduce the chance of diarrhea, especially in children.

Water pasteurization indicator

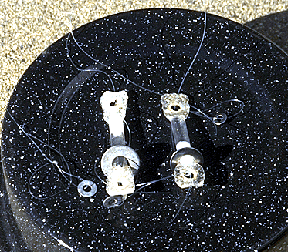
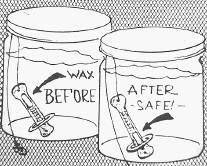
How can one determine if heated water has reached 65° C? In 1988, Dr. Fred Barrett (USDA, retired) developed the prototype for the Water Pasteurization Indicator (WAPI). In 1992, Dale Andreatta, a graduate engineering student at the University of California, Berkeley, developed the current WAPI. The WAPI is a polycarbonate tube, sealed at both ends, partially filled with a soybean fat which melts at 69° C ("MYVEROL" 18-06K, Eastman Kodak Co., Kingsport, TN 37662). The WAPI is placed inside a water container with the fat at the top of the tube. A washer will keep the WAPI on the bottom of the container, which heats the slowest in a solar box cooker. If heat from the water melts the fat, the fat will move to the bottom of the WAPI, indicating water has been pasteurized. If the fat is still at the top of the tube, the water has not been pasteurized. The WAPI is reusable. After the fat cools and becomes solid on the bottom, the fish line string is pulled to the other end and the washer slides to the bottom, which places the fat at the top of the tube. Another pasteurization indicator has been developed by Roland Saye which is based on expansion of a bi-metal disc which is housed in a plastic container. This also shows promise and is in the early testing stages.
The WAPI could be useful immediately for people who currently boil water to make it safe to drink. The WAPI will clearly indicate when a safe temperature has been reached, and will save much fuel which currently is being wasted by excessive heating.
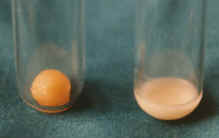
[Editor's note: Using Beeswax & Carnauba Wax to Indicate Temperature: In SBJ #15 we discussed using beeswax, which melts at a relatively low 62º C, as an indicator of pasteurization. We have now found that mixing a small amount of carnauba was with the beeswax (~1:5 ratio) raises the melting temperature of the beeswax to 70º - 75º C. Carnauba wax is a product of Brazil and can be bought in the US at woodworking supply stores. Further testing needs to be done to confirm that the melting point remains the same after repeated re-melting. Write to webmaster@solarcooking.org  and we will send you a small amount of carnauba wax to experiment with.]

Different strategies for solar water pasteurization

The solar box cooker was first used to pasteurize water. David Ciochetti built a deep dish- solar box cooker to hold several gallons of water. At this time of the year in Sacramento, three gallons could be pasteurized on our typical sunny days.
Dale Andreatta and Derek Yegian of the University of California. Berkeley, have developed creative ways to greatly increase the quantity of water which can be pasteurized, as we will hear about at this conference.
I am also excited about the possibility of pasteurizing water using the simple solar panel cookers. By enclosing a dark water container in a polyester bag to create an insulating air space, and by using lots of reflectors to bounce light onto the jar, it is possible to pasteurize useful amounts of water with a simple system. It takes about four hours for me to pasteurize a gallon of water in the summer with the system I am using. Solar panel cookers open up enormous possibilities for heating water not only for pasteurization, but also for making coffee and tea, which are quite popular in some developing countries. The heated water can also be kept hot for a long time by placing it in its bag inside an insulated box. In the insulated container I use, a gallon of 80° C water will be approximately 55° C after 14 hours. Water at a temperature of 55° C will be about 40° C after 14 hours, ideal for washing/shaving in the morning.
I will close with some advice from the most famous microbiologist, who pioneered the use of vaccinations in the 1890s: Louis Pasteur. When he was asked the secret of his success, he responded that above all else, it was persistence. I will add that you need good data to be persistent about, and we certainly have that with solar cookers; the work in Sacramento, Bolivia, Nepal, Mali, Guatemala, and wherever else the sun shines. Continued overuse of fuelwood is non-sustainable. We need to persist until the knowledge we have spreads and becomes common knowledge worldwide.
For questions or comments contact Dr. Robert Metcalf at  rmetcalf@csus.edu.
Dr. Robert Metcalf
1324 43rd St.
Sacramento, California 95819 USA.

Saturday, May 18, 2013


A Primer on Propane for Prepping and Survival – Part Two


propane-gas-burner-md (Custom)Two weeks ago, when I posted an article on prepper propane, I had no idea that there was such a thirst for knowledge on the topic.  Nor did I expect my technical consultant, Chris Newman, to respond to each and every comment asked not only here but also on Before Its News.
Today I am sharing Part Two in the series “A Primer on Propane for Prepping and Survival”.  If you have not read it yet, part one covered covered propane safety, various types of tanks, the cost-benefit of refilling empty tanks and how to obtain free (or cheap) old-style bulk tanks.  What you learned in part one was how, with some creative scrounging and smart purchasing, to acquire enough tanks to provide at least minimal cooking and night lighting for about a year, at nominal cost.
If you haven’t yet read Part One, you’ll find it at hereA Primer on Propane for Prepping and Survival.
INTEGRATING PROPANE INTO YOUR PREPPING STRATEGY – PART TWO
In this article we will cover the easy low-cost refilling of expensive (when new) green one pound canisters and some of the challenges that they can pose. We’ll also cover some of the main low-usage appliances for propane that will make life easier, and more secure, in a grid-down scenario while transitioning to a possible new world order.
Refilling One Pound Canisters from 20 Pound Bulk Tanks
With the right kind of adapter, described further below, it is a fairly simple process to transfer liquid propane from a bulk tank into small green canisters and vice-versa. There are a couple of critical things to keep in mind, however:
Propane in the container is in two forms: liquid and gas. These are both pure propane, but at room temperatures, the liquid will quickly and greatly expand in volume to a gas as the vapor pressure reduces. There are no practical uses for liquid propane, other than transferring it between containers, and lots of potential problems (such as explosive clouds of white gas), so you want to avoid releasing liquid propane, whatever it takes. If you deliver liquid form into a small propane heater, for instance, the liquid fuel can do some real damage, rendering the heater inoperable, with no easy repair.
A more critical example would be if you connected a one pound canister to a camp stove, with the canister either over-filled or upside down, so that the output is liquid, instead of gas: Liquid propane could jet out of the burners, it will quickly expand to a large cloud of gas just when you’re trying to light it and something’s going to go Boom! With any luck, the only thing that will get singed is your eyebrows, but you could also destroy the equipment and even suffer eye injuries that will be painful and take a long time to heal, just when you don’t have the time to waste.
But, if it was a huge cloud of flame and you happened to be sharply inhaling at the moment, such as from surprise at the huge cloud of flame that’s currently enveloping your face, you’ll end up literally breathing in the flame into your lungs. When you burn the lining of your lungs, they will start oozing liquid to the point of filling up and you will probably die of pneumonia within 15 minutes, if you’re lucky. If you’re not lucky, it will take even longer.
I can promise you that it will be the most miserable 15 minutes of your life. In a slightly different scenario, this actually happened five years ago to someone for whom I cared a great deal, and Julie did die, alone on the floor of her kitchen, with her traumatized dog lying by her side. The memory still makes me ill. So, I’m here to tell you that that this type of deadly injury really can happen.
Sorry to get so heavy, but this really happened in my life and my point in making this so personal is to hammer home the point that, when you play with propane, you’re literally playing with fire, and a more of it than you’ve probably ever experienced. Like a firearm, propane is a powerful and valuable survival tool, but it needs to be handled with the utmost of both understanding and respect. That’s why I keep hitting safety issues so hard and so frequently.
So, before you start down this propane road, especially if you’re going to color outside of the lines, you’d better have a very clear idea what you’re doing. That’s the whole purpose of this long article, which is intended to bring the average reader up to speed from a standing start.
But, if you keep a few possibly-new basic principals in mind and carefully read the all of the instructions that come with every propane appliance, propane can also save your life, or at least make it a lot more pleasant in a grid-down situation.
Propane: It’s Both a Gas and a Liquid, In the Same Tank
Again, propane inside the tank is in both a gas and a liquid form that can quickly expand into a surprisingly large cloud of gas and that can touch off into a large explosion with the slightest spark.
Fortunately, it is easy to choose which form, gas or liquid, that you want to dispense out of the container, depending upon whether you are transferring fuel between containers or using it for practical purposes:
When the container is standing upright with the outlet at the top, the liquid propane is at the bottom of the tank, so what will come out is the gaseous form, which will be quickly replenished from the liquid form as internal tank pressure goes down. When you’re using propane for practical purposes, this gas is what you want.
But, when the tanks are upside down or possible on their sides, what will come out is liquid propane. Generally, the only time that you want this liquid is when you’re transferring fuel from one container to another.
Just keep in mind, for consumer-level propane hardware: “Upright gets you gas and upside-down gets you liquid.”
The One Pound Canister Refilling Process
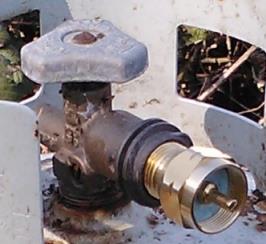
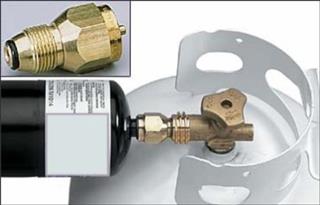
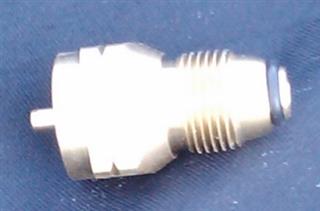
The key component that you need to refill small one pound propane canisters is an adapter which costs about $15 and is called a MacCoupler Adapter.
propane4 (Mobile)
In the photo above, on the right side, you can see the black rubber O-ring that seals it to the bulk tank.
Here are photos showing it mounted onto a bulk tank.
propane5 (Mobile)
Mr. Heater MAC Coupler Propane Adapter
Don’t forget, this is a reverse thread, so turn it *counter-clockwise” (lefty-tighty). You can start threading this in by hand. Tighten lightly, but still with a wrench.
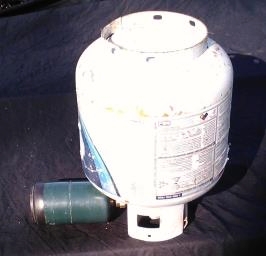
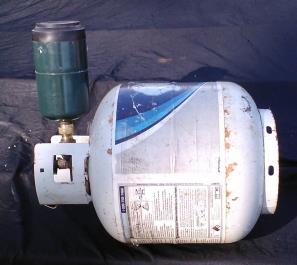
The photos below show proper container orientation during various operations.
propane7
Above:  The proper position to transfer fuel from the bulk tank into the canister. (The plastic tank wrapper has since been removed.)
propane8 (Mobile)
Above:  The proper orientation to transfer fuel from a canister back into the bulk tank. If you want to completely refill the bulk tank, you’ll have to go through this operation at least 20 times. But, if you’re throwing a big barbecue and run out of gas, this could save the day. Ditto, if you need to run something that’s set up for bulk tanks, but all of yours are empty.
The Fuel Transfer Process
Transferring fuel from one tank to another is relatively simple:
1. *With the tank valve closed,* install the reverse-thread adapter onto the bulk tank. Tighten it with a wrench until it is moderately snug, and don’t forget that it’s a reverse thread direction than normal. The actual sealing mechanism is a rubber O-ring on the adapter and these don’t require huge torque pressures to seal. “Just snug” is just right. You’ll find specific directions on tightening a little further below.
2. If refilling a small canister, turn the bulk tank upside down and place it on a flat sturdy surface to avoid tipping over. Remember, you want to transfer the liquid form, which is at the bottom, so the outlet needs to be at the bottom. Keep the bulk tank valve closed.
3. Attach the canister to be refilled onto the other side of the adapter. This time, however, the threads run in the normal “righty-tighty” direction. Again, the seal mechanism is a rubber ring, so just snug it in place. Important Note: If the adapter connection to the tank is too loose and you screw in the canister on the other side with too much force, you will actually start unscrewing the adapter from the tank, potentially releasing gas into the airspace that you’re currently occupying. Again, “no bueno.” This is why you need to keep the bulk tank valve closed at all times, except when you are making the fuel transfer.
4. Once everything is properly oriented and connected, now is the time to open the tank valve and let the transferring commence. Keep an eye and ear peeled for gas leaks, in the form of a cloud of white gas. It may take a minute or so to complete the transfer, depending upon the temperature and remaining contents in the supply tank, both of which impact the supply pressure. When the hissing stops, you’ve transferred as much as is going to move right now. This is going to give you about a 50% fill of the canister.
(Transferring fuel from a canister to a bulk tank is the same process, but the canister needs to be upside down and the bulk tank on its side, as in the above photo.)
Achieving a Full Refill
But, wait! We haven’t run out of surprises, yet! The most common challenge in refilling one pound canisters is that it is normally very difficult to completely refill the canister.
This latest surprise stems from the fact that, while the liquid fuel temperature drops as the supply diminishes, at the same time, as fuel enters into a new container, the internal pressure increases, the canister gets *hotter* as a result and the pressure resisting the transfer into the canister rises nearly exponentially. At the same time, during the transfer process, the supply tank pressure drops and the dispensing pressure decreases.
The bottom line result is that a one pound receiving canister typically will only become about half-filled during the transfer, not to mention becoming quite warm. So, it will only last half as long before it runs dry. Assumed is that we want a full fill-up, or nearly so.
The most accurate way to keep track of the fill level is to weigh the canister with a small scale when it’s empty (you can’t hear any liquid sloshing around inside) and then weigh it again after filling. With a full fill, it should weigh exactly 16 ounces more than when empty.
Safety Note: You do NOT want to over-fill a receiving canister, and this is possible by having the supply tank too hot. That risks dispensing liquid fuel into your appliance, even if the canister is properly oriented, which can cause flash clouds of flame and/or damage the appliance itself, as described above. Conceivably, you could even risk bursting the canister by overfilling, explosively releasing a pound of vapor. The package insert that comes with the adapter contains a couple of dozen warnings and you should read and memorize all of them, as well as the safety warnings that come with every appliance. This isn’t salad oil, here.
The factory that fills new canisters uses high pressure pumps to overcome this temperature resistance phenomenon. But, we don’t have that option, which is probably just as well.
What you want for the best fill is a warm (not hot) supply tank and a cold receiving tank. The Net is full of suggestions on how to achieve this, some good and some very bad.
One of the worst ideas that I’ve seen is to heat up the bulk tank by letting it sit in the sun for hours. As we learned in the scout camping cautionary tale above, again, no bueno. Do NOT fill or top off a one pound canister from a hot (more than 85 degrees F.) bulk tank. If the ambient air temperature is higher than 85, it’s just not a good time to refill canisters. If this is an issue in your situation, the first thing in the morning, after a cooler night, is the best time.
Other suggestions, including in the MacCoupler adapter insert, suggest pre-cooling the receiving canister by either sticking it in the freezer or dunking it in ice water prior to filling. These are fairly effective at pre-compensating for “thermal resistance,” but in a grid-down scenario, freezers and ice water may be very hard to come by.
Here’s the easy way to get a full fill: Fill the canister twice.
That is, fill the canister as full as it will get without special temperature tricks, turn off the bulk tank valve and then let the canister cool back down in the shade or, if you have it, some cool water. Then, once it has cooled back down, top it off with a second transfer. Generally, this will get you about a 90% fill, which is usually good enough and leaves a little extra safety cushion to avoid an over-fill. It never hurts to leave in a little safety cushion.
If you have a scale, you can get a strong handle on your fill rates by weighing the canister before and after both steps. With a little practice, you’ll be able to make a pretty good guess without a scale just by the heft of the canister and the amount of “slosh” that you hear inside.
Handle With Care
While we’re on the subject of using propane adapters etc., in a grid down situation, these will be simply irreplaceable. They are the critical link in the canister refill system and there’s no way to easily cobble one together out of salvage. For this reason alone, it would be wise to have a new spare adapter in stock. If you don’t anticipate being able to easily replace this adapter, or even if you can, you need to treat these things with some gentle care.
These adapters are made out of relatively soft brass. So, it’s very easy to damage or even wear out the threads from hard repeated use, which could render the adapter useless, and make it no longer possible to refill small canisters from bulk tanks. If that happens, you’ll be stuck with all these handy portable propane appliances, but with no easy way to fuel them.
Here are several things that will extend the life of the adapter threads:
1. The first, obviously, is to not drop the adapter onto a hard surface: Hitting a rock can totally mess up the threads. You might be able to clean up the threads with a file or by gently starting it into the bulk tank threads and carefully using a wrench to restore the position of the banged-up threads, though they won’t be as strong resisting pressures of up to 200 PSI. For sure, make certain that whenever you start threading in the adapter, you start it in straight, not “cross-threaded.” If you can easily screw it in for a couple of turns with just finger pressure, you’re in good shape.
2. Another life-extending strategy is to lubricate the threads of the adapter before screwing it in or screwing something into it. A thin coating of axle grease or Vaseline would work fine. But, be sure to not let any get into the end opening or it will end up inside your smaller canister and eventually into the appliance, which could clog it up and prevent it from working properly. In a pinch, pull the oil dipstick out of your vehicle’s engine and let a drop or two drip off the bottom of the stick onto the threads. Even a light rubbing with a bar of soap will help to extend the thread life. Just don’t use any more lubrication than it takes to reduce the friction wear on the threads.
3. Another tip to minimize thread wear is to start threading the adapter onto the tank by hand, as tight as you can get it, until it starts resisting. Only then, tighten it down with a 1 1/8″ wrench. Over-tightening is what will wear out the threads the fastest and with a wrench this large, that’s easy to do. The main sealing mechanism isn’t friction or compression, as with other fittings, but a small rubber O-ring on the adapter that mates with another O-ring inside the bulk tank throat. The new OPD type tanks have a second spring-loaded internal valve that prevents gas from escaping when the valve is opened, but nothing is hooked to it.
“Hand tight to first contact, plus about 2 to 2 1/2 turns more with a wrench” should be about right.
And, of course, when you’re removing the adapter, remember the reverse thread and rotate the adapter on the clockwise direction: Righty-Loosy. There’s no faster way to strip out the threads then cranking it in the wrong direction with a big wrench during removal.
Watch Out for Leaks!
Finally, something thing to be very aware of is that, when you refill one pound propane canisters, which are really intended to be a one-shot deal that you throw away when it empties, is that the internal valve on the canister just might develop a slow leak. This is not uncommon with multiple refills, or even just one.
At best, you won’t have the fuel when you need it. At worst, that pound of gas can leak into a closed environment, such as a hot car trunk or closet and make a very satisfying explosion, unless you happen to be in the middle of it.
So, when you refill a canister, always test it by dropping in a little soapy water into the top of the bottle. If you see bubbles forming, you’ve got a leaker that will slowly (or quickly) empty out. This is also a good way to test all new propane connections. Rinse soapy water out of the canister outlet with a little clean water and let it dry before using it.
You can usually smell a small leak, too. The refiners add a “smellorant” that is very distinctive. If you can smell it, you need to act fast.
If the canister leaks badly enough to hear the hissing and you see a cloud of white vapor, you need to carefully move the canister to a safe and well-ventilated outdoor location, move away, let it empty out and then throw it away. That one’s a goner, though you might find some use for it as, say, a fishing float or else recycle the sheet metal to repair something else. Remember, we’re talking about a grid-down situation that may be long term, so don’t throw away anything that can be recycled or repurposed. Even tin cans and leaky fuel canisters.
If you get a moderate leaker, there are some things that you can do about it:
1. Mark the canister, if only marking an “L” in the paint on top of the shoulder, so that you can easily identify it later. They all look alike.
2. Attach something to the canister threads that will prevent further leaking. This is not a bad idea, anyway, when storing and transporting canisters. This “something” will be either screw-on caps or some sort of appliance that has a shut-off valve.
The least expensive option that I’ve been able to find is the Mac Coupler Propane Bottle Cap aka MacCaps. Two of these heavy duty brass caps will run you about $8, plus shipping. They’re also fairly common in sporting goods stores and departments for about the same price, but without the shipping cost.
These will certainly stop leaks, as well as protecting the canister threads, which are actually fairly durable. But, if you have dozens of irreplaceable canisters in your inventory, this can get spendy.
propane9 (Mobile)
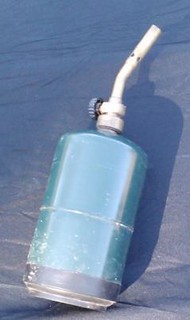
Another option is to attach the leaky canister to a propane appliance and use the control valve on that to stop the leak. One of my preferences is a small and inexpensive propane torch, the kind that plumbers use to solder copper pipes and which can thaw frozen locks etc. These torches will also do a great job of starting campfires even in windy situations, at least with fairly dry wood.
For new torches, one good value option is the Mag-Torch MT200C Propane Pencil Flame Burner Torch. One thing that I like about this one is the all-brass construction, which should be durable under most conditions. Other brands use a lot of plastic and their durability might be questionable. With one of these and a welder’s flint striker (described below), you can just about kindle a flame in a hurricane and it’s very unlikely to blow out. In a pinch, you could even boil some drinking water in a small tin can without having to build a campfire.
A self-igniting small torch could also prove very handy as a sure-fire flame source in almost all conditions, sort of like a Bic lighter on steroids. But, these are going to tend to be not as durable, so they should be held in reserve when any torch use is needed.
You can also frequently find these torches, and other propane camping gear, cheap at yard sales, too, and it doesn’t hurt to have backups, especially if you need something to “cap” a small canister that has started leaking, in order to keep it in service. I’ve picked up used serviceable torches for less than the cost of a new cap. Of course, test out any used propane gear as soon as you can, preferably before you lay out any cash. But, it usually tends to be fairly durable. If you’re going yard-saling, it couldn’t hurt to bring along your own fuel canister for testing, properly stoppered, of course.
3. A third option with slow-leak canisters is the “just in time” method: Just don’t refill them until you need them, then quickly attach them to the appliance. Keep a couple of refilled standby canisters on hand with some sort of capping device and leave the bulk supply tank set up to quickly refill them on demand. The rest of your stockpile of empty canisters is your reserve to replace the inevitable bad leakers.
When working with slow leak canisters, if you must, do this outdoors away from ignition sources, for sure, and don’t dally about connecting it up or capping it. Again, if it’s a fast-leaking canister, unless there is no other choice, take it out of the inventory and find another use for it.
That’s it for refilling small green canisters from bulk tanks. With a little common sense and some patience waiting for the canister to cool back down for a top-off filling, you’re good to go.
Replacements, Hardware and Appliances
Now, we’ll touch on the other stuff that you need to best take advantage of propane.
Stock up on O-Rings!
As we saw in the above photo of the MacCoupler, at one end is small a rubber O-ring seal. Even with proper thread care, these seals will still slowly wear out from use and they’re not a DIY item to replace. They’re fairly durable, but they’ll still wear from normal abrasion and, when they wear out, you may start getting leaks at the tank valve, no matter how hard you tighten it. How quickly they wear out will depend upon how often you screw the adapter into a bulk tank, which will refill about 20 one pound canisters before it empties.
One O-ring preservation strategy is to not remove the adapter from the bulk tank until it is emptied. If you need a bulk tank to power something, grab another one from your stockpile.
But, prepare for this inevitable wear and pick up some extra O-rings of the proper size while you still have the chance. These are quite inexpensive and easy to find at most auto parts and hardware stores, as long as they remain open. The simplest thing is to gently pry off the original O ring that comes with the adapter, perhaps with a plastic knife, take it to the store and tell the clerk, “I want a dozen of these.” O-rings often come in bags of a dozen or so, they’re cheap and having a new one when you really need it just might save your life.
Striking Sparks
The biggest challenge in kindling a flame, for whatever purpose, is creating the initial spark. Lighters, matches and flint/steel etc. are normal parts of the prepping stockpile. But, these all create fairly small sparks that can be problematic in windy conditions.
Magnesium fire starters, which drop burning metal onto the tinder, have their place, too, at least if you don’t have a small propane torch for continuous combustion until the wood catches fire. But, without a spark source of some sort, or a heavy (Glass 10X) magnifying glass, you’ll have to resort to rubbing two sticks together to kindle a flame, and that’s a long tedious process, at best.
Another really nice feature with propane is that it lights very easily in almost all conditions, assuming that you want it to, with a simple, if irreplaceable post-SHTF, flint spark striker. the kind that welders use to light their torches. These industrial strikers fit over the torch output end, put out a large volume of big fat sparks just by squeezing the handle, and they’re cheap.
A good value in flint strikers is the “Hot Max 24172 Single Flint Striker with 5 Replacement Flints“.  This striker is designed for industrial use, it will last for a long time and, with five replacement flints, you are assured of all-weather fire-starting spark for years. With a little extra effort, you might even be able to spark fine dry tinder into flame.
For extra security, since these are so inexpensive, deliver so many sparks and it would be very difficult to MacGyver a striker out of salvage materials, I’d have at least a couple, with spare flints, in the stockpile. For $11, you’ll have two strikers and 10 replacement flints, and so be in good spark shape for a very long time. If you want to stock up on barter items with a very high potential demand and value, welder’s spark strikers are a good choice.
Heat
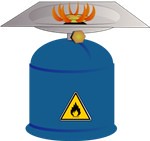
If you need a lot of heat in an open area or large vented space, nothing will perform better than a catalytic heater that mounts on top of a bulk tanks. But, these use up fuel like flushing a toilet. You’ll burn through a full 20 pound tank in less than a day, so these aren’t really a good option in grid-down, except maybe for an emergency. You’re better off with a campfire or wood stove.
The smallest and safest canister-fueled propane heater seems to be the Mr. Heater Buddy Indoor-Safe Portable Radiant Heater for spaces up to 200 square feet These will last for about 2 – 5 hours per canister, depending upon how high you crank it. At a low burn and five hours of heat per night, a bulk tank will last you about three weeks.
This heater comes with a built-in low-oxygen detector that shuts it down if the oxygen level gets consumed too far. The unit burns at a very high efficiency, so oxygen depletion is usually the biggest concern. If you find yourself gasping for air, you’re low on oxygen (O2) and building up carbon dioxide (CO2) in the air. So, get some fast ventilation from a door or window. But, it’s not going to silently kill you.
However, for suspenders and a belt, it sure doesn’t hurt to have a carbon monoxide (CO) detector, too. There are a variety of CO alarms available that range from $40 and up, but read the reviews carefully; Some are a lot better than others.
One of the best-reviewed seems to be the Universal Security Instruments Carbon Monoxide and Natural Gas Alarm. I like both that it’s a dual methane/carbon monoxide unit and that it has a battery backup.
Cooking
For compact cooking portability, I particularly like the Coleman PefectFlow 1-Burner Stove.  This is a minimalist 10,000 BTU burner that screws onto the top of a canister, with a canister base to keep it more stable. Depending on how hot you burn it, a canister will last about 2 to 5 hours.
But, there are many other choices, too.  My advice is to look for something that fits your budget, meets your needs and has good reviews.
For the best fuel efficiency, I really prefer a steel wok. With this, you can fry, steam and even make soup or boil drinking water, with just a small flame under the center of the bottom. You can also use it with just a tiny little campfire, which saves a lot of labor in finding wood. In Asia, they are frequently fueled by charcoal, which is easy to make off-grid, but the topic of a different article.
I especially like the fact that you can store a small screw-on stove, like the PerfectFlow, and a one pound canister, inside the wok, mostly. It would be a little cumbersome in a bug out bag, but it’s a lot of compact self-contained instant cooking capability to fit into about 1/2 cubic foot of space, with a total weight of just about three pounds. If you’re reduced to eating roots and grubs, they’ll taste a lot better if they’re sautéed.
One good option is the Town Food Service 14 Inch Steel Cantonese Style Wok which I also recommended in part one.  The Cantonese style has two small handles, which makes for easier transport. The Mandarin style wok has both a small handle and a long heat-proof handle, like a frying pan, that makes it easier to flip food and move with one hand, but is more cumbersome to carry and store.
I can’t think of a smaller, lighter family-size “Bug out Kitchen” and later night lighting for less than $75 than this combination of mini-stove, mini-lantern and wok.
As with cast iron cookware, you’ll need to pre-season the cooking surface of steel woks. Gaye has an excellent article on seasoning cast iron in another section of Backdoor Survival, so follow these same directions. Also, keep in mind that this steel has no rust-resistance properties at all. So, dry it well after use and, ideally, give it a light coat of oil inside and out.
Another option that won’t rust, though more costly, would be a stainless steel wok. You’ll find some choices here.
Light
One of the best and most-efficient uses for propane is for lighting. With a little forethought, you can even squeeze a little heat and cooking out of it, without using extra fuel. Typically, a two mantle lantern will run for about 7- 8 hours on a one pound canister.
You’ll find a variety of these at varying prices at here.  Again, read the reviews.
My top choice for minimalism is the Coleman One-Mantle Compact Propane Lantern. For absolute minimal fuel usage, weight and storage, this is the one. This is so small that you should be able to fit it inside the wok, along with the PerfectFlow stove, for no extra space and just handful of ounces of added weight. $24. They don’t mention how long a canister will last, but it should be on the order of 14 – 16 hours.
Since propane lanterns also put out a great deal of heat, and burn very cleanly/efficiently, they can do some nice double duty providing both heat and light. With proper ventilation and, ideally, a carbon monoxide detector, of course. When I’ve gone camping in my Scamp micro-trailer, normally a lantern has provided all the heat I need, for no extra fuel usage. If you mounted a rack above the lantern to hold your wok, you might even be able to make some hot coffee or tea and transfer some of the waste heat to inside your body, where it will do the most good.
And, geez, stock up on lantern mantles! When fired off, these are fragile ceramic nets that will crumble and become useless if you even look at them cross-eyed. Without a functioning mantle, your lantern, whatever the fuel, is worthless. These are definitely not a DIY item.
Refrigeration
Finally, propane is also a source off-the-grid refrigeration, usually by means of a gas absorption refrigerator, the kind that you find in RV’s, though some brands in RV’s seem to break fairly frequently and none are easy for amateurs to repair. Pulling a propane fridge out of an old RV and plumbing it for standalone use is possible, but not a recommended project for beginners.
On the plus side, propane refrigerators are not especially high consumers of fuel, so if food is hard to come by, preserving it with propane-powered cold might make sense. If you have medications that require refrigeration, having cold storage could save a life. For sure, place these in the coolest location available. But, if you’re going to go with propane refrigeration, increase your bulk tank stockpile.
One of the least expensive options, currently at $315 with shipping, is the Porta Gaz  3-Way Portable Gas Refrigerator.  A nice feature with this one is that it will also run on 120 volt AC power, as well as 12 volts. So, it could also be powered by solar cells or even a vehicle, if you have the gas. Or, a small wind turbine driving a car alternator. There was no indication of the power draw, but they don’t draw much compared to, say a tank-type water heater. If you’re going to go this route, more research to match solar power capability with the power draw, and some field testing, would be an excellent idea.
Conclusion
So, that about wraps up this long starting point to safely integrate propane into your prepping plans. The practical comfort that your stockpile can bring, and especially the labor that you won’t have to spend gathering wood from an ever-increasing distance, can make the difference between barely surviving and prospering toward a brighter future. The way to become proficient in using propane is the same way that you get to Carnegie Hall: Practice, practice, practice!
At the risk of sounding like Hank Hill, I’ve really just barely scratched the surface for propane. Unless you live in the city, there is much to be said for going whole hog into the propane lifestyle for your home. Millions of people have already done so. But, again, you need to have a good idea about what you’re doing and I’ll leave this research up to you: Just Google “propane” and you’ll find a wealth of information, much of it pretty good. When in doubt, ask your local residential propane delivery dealer.
Thanks for reading! And, remember: “Safety First!”
THE FINAL WORD
Backdoor Survival readers provided some great feedback, useful tips and good questions in the comments section from Part One.  Although many of the questions themselves were covered in this article (part two), there were a few issues that are worthy of some additional discussion, especially as it relates to safety.  For that reason, Chris has agreed to “Prepper Propane – Part Three” and of course, I am thrilled.

Thursday, May 16, 2013

A Primer on Propane for Prepping and Survival


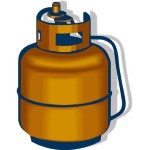
Propane TankCall it serendipity if you will but a couple of months ago when I was contacted by Chris Newman, inventor of the InstaBed Cubic Foot Garden System, I had no idea that I was about to meet and get to know a really smart guy with MacGyver like skills and knowledge in all aspects of prepping and survival.
Chris has been generous in sharing his knowledge with me – from gardening to solar energy to grains and more – and has graciously agreed to become a technical consultant to Backdoor Survival.  He is doing this in the spirit of spreading the preparedness message and hopefully making our world a bit greener and more livable in the process.
Today I am thrilled to share a primer on propane that Chris wrote specifically for Backdoor Survival. He covers a topic near and dear to me personally since my household cooking and heat as well as my backup generator is fueled by propane.  And whereas my home is served by a large, community-based propane tank, I now have some workable strategies for stockpiling a backup supply of propane in portable tanks not only for my own use but for barter purposes.
Read on.
INTEGRATING PROPANE INTO YOUR PREPPING STRATEGY – PART ONE
This article covers the basics of propane as an important prepping energy resource. The subjects include safe propane handling, storage, assembling a stockpile of bulk tanks for long term storage at the lowest possible cost and refilling the smaller one pound canisters that are commonly used with portable camping gear, for about 1/5 the cost of new. We’ll also examine a variety of entry-level propane appliances and their suitability in a survival scenario.
Why Propane?
For convenience, value, air quality and long term storage stability, nothing beats propane.
Firewood is cheaper, if you have access to it and you don’t count the value of your time. But, when you’re burning all day and every day, it isn’t all that convenient if you have to go out and cut/gather it yourself. The stuff is heavy, especially if you’re hauling it a long distance. And, how are you at swinging an ax for hours at a time?
If you’re short on survival labor, which is a fair probability, having the option to cook with propane for an extended time, at least until things settle out, will let you channel that considerable fuel-wood time and energy into other important tasks, such as hunting and growing food, or warding off predators. Also, the ease of using propane allows the delegation of cooking etc. to a lesser-able member of your party, allowing all to contribute to the general welfare.
A Hedge Against Inflation
From an investment standpoint, the prices of both propane and the hardware/appliances that use it are directly tied to monetary price inflation – the “hidden tax” that steadily gnaws away at the purchasing power of your hard-won savings. Inflation is currently being deliberately manipulated to keep it low for now, but some price categories, like food, are still skyrocketing, with wages not keeping up. And, the economic stage is strongly set for hyper-inflation in the not-too-distant future.
So, one of the best investments in pre-inflationary and inflationary times (aka hedges against inflation) is hard goods and consumables, like food, that you’ll be using anyway and that will surely cost even more in the future. In other words, to combat inflation, the best place to store your surplus wealth is in tangible stuff, not pieces of paper, or electrons. For sure, no matter how the future shakes out, the retail prices for propane and propane hardware won’t be getting any cheaper, and they probably will go up by a lot.
Properly stored, both fuel and hardware will last indefinitely without degrading, ready to use on a moment’s notice. For all intents and purposes, unlike food, there’s no limit to its shelf life.
So, you’ll save money in the long run, anyway, by stockpiling consumables. But, if the grid goes down, there won’t be any more propane available to buy at all and the value of your investment will go way up. So, the larger your stockpile and the smaller the appliances that use it, which use less fuel, the longer it will last you.
If you play your cards right, you can stockpile at least a year’s worth of cooking and minimal lighting fuel for an average family (10 full five gallon bulk tanks that are equal to 200 small green canisters) for about $200, and do so $20 at a time.
Safety First!
If not handled with respect, Propane is DANGEROUS! As in dynamite dangerous and AK-47 dangerous. As in blowing up your whole house into kindling dangerous. This isn’t vegetable oil. So, treat it with prudent caution and always, always, always read, understand and follow the safety directions that come with every propane product.
Never store tanks of propane indoors or in any other sealed environment. Especially, if you see, smell or hear a gas leak, shut off the source immediately and then fix the problem before you continue. If you can’t shut it off, move away, warn others and cross your fingers. Otherwise, you’ll very likely go up in a cloud of smoke and all your hard-won prepping will have been for naught.
On the plus side, propane has been used as a consumer product for nearly 100 years and stringent government regulations require hardware designs that are fairly, if not perfectly, fool-proof. So, it’s not like you’re handling nitroglycerin. But, unless you really know what you’re doing, don’t try to modify or override the hardware safety features.
Unlike gasoline vapors, pure propane is nontoxic, though it’s certainly not healthy to breathe it and you should avoid it as you would with wood smoke. However, as with all combustion, there’s a real risk of oxygen depletion in a sealed room and proper ventilation should be an ongoing consideration. If you find yourself starting to gasp for air, triggered by a buildup of carbon dioxide, that’s an early warning sign that the oxygen is running low and it’s time for some fresh air, no matter how cold it might be.
Unlike natural gas, propane is heavier than air (1.5 times as dense). In its unburned state, propane vapor sinks and pools at the floor level. So, simply opening a couple of high windows to vent a leak may not be enough: You need to open a door or something else at ground level to let the heavy unburned vapors “drain” outside to disperse.
Liquid propane, say from a broken hose or leaking tank valve, will flash to a vapor at atmospheric pressure and the vapor appears white due to moisture condensing from the air. A big cloud of propane in the open air will blow up with the slightest spark, even static. So, you want to avoid coming even close to these.
Those basic risks described, however, if you treat propane with respect and understanding, there is no better fuel to stockpile for long term storage and multiple uses in survival situations, at least where you are not on the run, and while it lasts. Especially, when you use propane for just vital things like cooking and night lighting, the use rate is surprisingly low and a little propane will go a long ways.
What is Propane?
Propane is a gaseous byproduct in the refining of both oil and natural gas. It can be compressed into a liquid at relatively low pressures and will readily convert back into a burnable vapor under any conditions which humans can tolerate. First synthesized in 1910, it has been in commercial production since the 1920′s and the technology of using it at the consumer level is very well refined.
90% of all propane used in the US is from US sources, with 70% of the remaining amount coming from Canada. So, using propane fuel doesn’t fund jihad by our enemies and the money remains within the US economy, which are two of the reasons why I like it, beside the many practical prepping utilities.
Propane combustion is much cleaner than gasoline and other liquid hydrocarbons, though not quite as clean as natural gas combustion. Environmentally, it’s usually greener to cook with propane than with electricity. With a perfect burn, attainable only in theory, the only by-products are heat, carbon dioxide and water vapor. So, it can be used for indoor heating applications, but use a stove that provides a very high combustion efficiency and, especially, a low-oxygen sensor that will shut it down if the O2 gets low.
Convenience and Labor Savings
Another way to look at propane is as a serious labor saving device. In a self-subsistence scenario, your greatest critical shortages are going to be labor and the energy to power it. With propane in your resource inventory, the large amount of work that would normally have to be expended gathering and processing fuel for a cooking fire can then redirected into other critical tasks, such as growing food etc.
When cooking is less labor-intensive, it can also be assigned to the lessor-able in the party, such as older folks with more enthusiasm than physical stamina, while they simultaneously babysit and teach the young ones how to cook, freeing up the parents to work elsewhere.
The easiest way to implement propane into your prepping strategy and to start climbing the learning curve is to start looking for ways to incorporate it into your day-to-day life. It doesn’t much matter where you start, but probably the best place is cooking. So, if you don’t already have one, start shopping for a camping cook stove. Amazon has a good assortment  and you can often find propane stuff at very attractive prices at yard sales etc. Generally speaking, you want appliances that use those green 1 pound propane canisters that cost so much new, but that can also be easily refilled at a huge savings.
To develop your proficiency in advance, fire up the camping stove and cook at least a few meals with it, perhaps practicing your prepper cooking recipes at the same time. Maybe hold a “grid-down weekend” drill, where you live off nothing but assembled resources, in order to test your resources and quickly determine what’s missing. You’ll be killing at least three prepping proficiency birds with one stone: Propane, using your portable stove and subsistence-style cooking from stored food.
Propane on the Run
An empty bulk tanks weighs 19 pounds and, when full, will weigh 39 pounds. So, they’re not exactly ideal to bring along when running for your life on foot. However, if mobility is mandatory until you reach your safe haven (you do have one lined up, don’t you?), simple single-burner stoves can be quite small and compact.
When combined with wok cooking, which includes stir-fry, steaming and soups/stews etc., you can feed a feed a lot of people with very little fuel. Asian folks, where fuel is always in critical shortage, have been using woks to cook for countless years as the most fuel-efficient way to prepare food over a tiny flame.
For truly minimalist propane use, such as in your bug out bag, a good choice is the Coleman PefectFlow 1-Burner Stove that screws directly onto the top of the canister.
Between the stove and fuel canister, you’ll add about two pounds to your load. But, you’ll also be able to boil a lot of questionable water for drinking, instant soups, coffee etc. which will also help cut the chill, and heat some quick meals whenever you can stop running for a few minutes.
Adding a small Cantonese style hammered steel lightweight wok and a couple of utensils won’t add much more weight, and will give you even more subsistence options. The tiny stove and a canister will pack, mostly, inside the wok. Don’t forget to pre-season your new wok, as you would with cast iron.
Costs
All things considered, propane as a backup energy supply is dirt cheap. There’s a huge amount of high cost technology involved in the production of the gas and storage containers that you won’t be able to replace on a DIY level. Since propane is a byproduct of other processes, the market price doesn’t reflect its true cost to create it, as with, say, solar panels.
As for cost per heat unit, propane is cheaper (and a lot safer to use) than any of the liquid fuels, though not quite as cheap as piped-in natural gas, none of which will be available in a grid-down situation.
The market price range will generally fluctuate along with the rest of the hydrocarbon market, so stock up shortly after gasoline prices go down, after the propane dealer has had a chance to catch up to lower their prices, which they are frequently not in a hurry to do, unless prices are going up.
For the first couple of bulk tanks in the stockpile, at least, I wouldn’t stress too much about waiting for prices to drop to rock bottom. Even a 50 cents/gallon price difference is still only $2.50 for a bulk tank and I’d hate to get caught in the dark and cold because I delayed and tried to save a little pocket change. Once you’re basically prepared with a couple of bulk tanks, you can then start extending the time that you acquire the balance of your stockpile on a timely and cost-effective basis. Even one bulk tank, with sparing use, should keep you going comfortably for a month of grid-down.
Just to make things confusing, propane is sold in two different measurements: In pre-filled container form, it is sold by the pound of fuel. But it’s sold by the liquid gallon in bulk form. One gallon of liquid propane weighs just over four pounds, or will fill four green one pound canisters.
Since refilling, either by the dealer or the prepper, is never 100% to a container’s capacity, your results will likely vary a little from the measured theory, but this is close enough for long term planning,
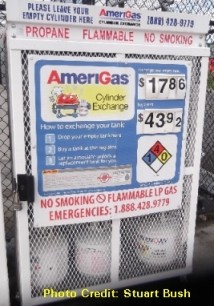
A brand new empty 20 pound (aka five gallon) bulk tank, the kind that your outdoor barbecue uses, will cost you about $25-$30. It must then be filled with 5 gallons of propane (currently $2.59/gallon at the farm co-op near my home in the Seattle area), which will cost another $12.95. So, the total cost for a brand new full bulk tank will run about $40.00.
propane3
If you obtain your propane by trading in your tank for a pre-”filled” tank at the local store, it’s going to cost you about $18-$25. The higher price in the above recent photo at the local Wal-Mart is if you don’t have a trade-in tank. The lower price is if you do: A difference of about $26, or about the price for a brand new tank. Some propane kiosks will also charge a higher price if your trade-in tank is “non-OPD,” which we’ll cover a little later. You wan to avoid these like the plague.
But, the tank that you receive in trade won’t be full, because the suppliers deliberately do not fill it to capacity. To me, this is on a par with watering the booze. The shortage can vary from 2 pounds (10%) up to 5 pounds (25%) so, in order to figure out how badly you’re being ripped off, check the new tank’s label for the net weight in pounds and subtract that from 20. Around here, trade-in tanks are often 3 pounds (15%) light, so I’ll use that figure.
Trading in is a very costly way to buy propane, at least if that’s your only intent. On a trade-in basis, assuming a $20 trade-in price for the tank, each gallon of propane is going to cost you $ 4.71/gallon, which is a lot more than $2.59 in bulk, especially when you’re talking about five gallons per tank and multiple tanks in the stockpile. If the shortage is greater than 3 pound, you’re paying an even higher price for the fuel.
Propane prices, whether bulk or trade-in and besides market fluctuations, will also often vary by a great deal within the same region. It all depends on where you buy it. I have found that the cheapest place to buy bulk propane is at the local farm co-op. The most expensive is at gas stations near freeway interchanges that see a lot of RV traffic, where the price can be double the co-op’s price. For trade-ins, Wal-Mart has always been about 10% cheaper than other outlets, and that’s one reason to trade in your tanks there. So, shop around and find the best bulk prices in your area.
Another reason to not buy brand new tanks, if you’re going to be trading them in, is that you will lose that shiny new tank, getting a used one back. On a practical level, this doesn’t really matter. But, the idea of trading new for used still grates on me.
One Pound Canisters
A brand new 1 pound small green propane canister will run anywhere from about $2.50 to $7.50. $3.00 is about average locally, so I’ll use that figure. A gallon of propane in one pound canisters is going to cost you about $12.00. So, while this is certainly convenient, it’s also very expensive. Fortunately, these small canisters can be refilled many times for about 65 cents each and we’ll detail how to go about refilling later in this article.
Hardware
Something worth mentioning is to not confuse one pound propane cylinders and hardware with butane-powered ultra-light gear, which are primarily designed for backpacking. A tiny 4 ounce tank and stove might be great in your bug out bag, but this is not a good ongoing fuel source: The tiny tanks won’t last long, bulk butane is difficult to find in the best of times and there is no easy way to refill the tanks. The way that the tanks connect to the hardware is different than propane, too, so there’s no chance of mixing up the two.
One other caveat is that bulk propane tanks require a pressure-reducing regulator before you hook them up to most appliances. You can find these on gas barbecues and RV’s and they generally are very durable. On the other hand, the small one pound canisters do not require regulators and can be directly connected.
Yet another warning is to avoid tanks with rust in the metal, if at all possible. This rust weakens the strength of the tank wall and, if it gets bad enough, it will blow out from internal pressure, releasing all the gas in an explosive cloud, with no way to shut it off. For this reason, a brand new tank is supposed to be inspected and recertified 12 years after it was manufactured. After that, the tank is supposed to be recertified ever five years. As a practical matter, I have never had a bulk dealer check the certification date on any tank that I was having filled.
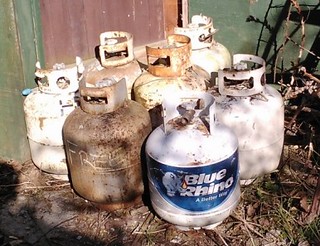
propane1 A few small scratches with a little rust is common and no big deal. But, if there’s serious rust, such as on the tanks in the above photo of my trade-in stockpile, you need to trade them in, whether they have the new style valve or not. The trade-in companies will clean, repaint and re-certify them, if possible.
But, if you’re keeping your tanks and plan to refill them with bulk gas, try to avoid scratching and dinging the paint as much as possible. If you really want to preserve them, add a can of white Rustoleum paint to your supplies, which is designed to go directly over rust, and touch up any scratches to protect the exposed steel from rusting further. If you store them outdoors in the weather, the tanks will eventually look like those in the above photo. So, the best place to store them is dry and out of the weather, but with plenty of ventilation. (Don’t just cover them up with a plastic tarp, which will concentrate condensation and be even worse than normal weathering.)
Finally, keep in mind that the threads into which you connect things to a bulk propane tank are *left handed.” That means that they need to be screwed in in the opposite direction as normal, counter-clockwise, instead of clockwise. In this case, “Lefty tighty, righty loosey.” This is especially important to remember when you’re disconnecting something from the tank valve: If you crank down hard in what would be the normal loosening direction, all you’re doing is making it tighter. If you’re strong enough, you’ll actually strip out the brass valve threads and that will destroy the tank for any further use, except trading it in, if the stores are even still open.
propane2
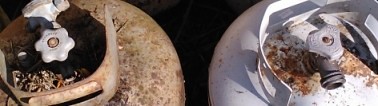
Thanks to a change some years back, bulk propane tank valves have been upgraded to what is known as OPD (Overfill Protection Device). This valve prevents over-filling the bulk and it also prevents gas from leaving the tank if the valve is opened, but nothing is hooked up to it.
You can easily see the difference between old-style valves and new-style in the above photo: The old-style, with a star-shaped knob, is on the left. The new-style OPD, with a triangular knob, is on the right. Replacing an old-style valve with a new-style valve on an old tank is not something that amateurs should do, except in an emergency.
By law, bulk propane dealers cannot refill tanks with old-style valves. But, they will happily refill trade-in tanks, even with the labels still on, which will save you $10.60 per five gallons over the trade-in cost. If you have 10 bulk tanks in your stockpile, refilling your own tanks creates a savings of $106, so it’s well worth the extra trouble.
In theory, your bulk propane dealer can top off the partially-filled trade-in tanks, but it would be a real imposition to ask them to go to the trouble for a gallon or so. If it’s a friend who would do you a favor anyway, that’s another thing, however. I wouldn’t feel too badly asking for a top-off of one recently acquired trade-in tank, if I was also having two empty tanks filled at the same time.
New-Style Tanks for Old
One of the really cool things about change, as much as most people hate it, is that this is where you find the best opportunities to save/make money. In this case, there is the opportunity to save a lot of money by obtaining empty old-style bulk propane tanks free or cheap and trading them in for “full” new-style tanks. For each old-style tank that you trade in, you’re going to save about $20, even factoring in the higher price of gas and the shortage. When you’re first setting up a stockpile of 10 tanks, that will reduce your total cost by $200, or about half the price of brand new, which will buy a lot of other prepping gear.
The reasons to go to Wal-Mart for your exchanges are 1. They’ll probably be the least expensive and, 2. The employees aren’t going to care what you’re trading in.
While the changeover happened more than 10 years ago, there are still lots of old-style tanks kicking around, of the countless millions that were produced. Since they can’t be refilled, they’re too light (18.5 lbs.) to be worth a trip to the local metal recycler and too heavy/bulky to throw in a garbage can, they tend to stick around, taking up space. A great place to find them is on the front of old RV trailers that haven’t moved in years.
In my experience, most people who are stuck with old-style tanks have been delighted to give them to me for free. So, look around and see what you can spot at friends and neighbors. I obtained many of my stockpile of tanks in the days when I was buying and selling vintage RV trailers. The unit may have had old-style tanks when it came in, but it didn’t when it sold.
Another good place to check for old-style tanks is local RV dealers who deal in a lot of trade-ins. They may just have a stockpile out back and be happy for you to haul them off.
If I really wanted to score a lot of trade-able tanks, I’d run an ad on Craigslist and offer to pay $5 each, delivered to my home. There are lots of amateur metal salvagers scrounging around, who work cheap, that the metal recycler would pay them less than $1 per tank. So, they would love to find a $5 buyer and you’ll probably have offers for more trade-in tanks than you need. Even paying $5 each, and not counting all the time and trouble you’d have to go through to obtain them for “free,” as well as the missing fuel in trade-in tanks, you’ll still be saving $14 per tank, over buying them brand new.
(At the same time, in the CL ad, I’d also be looking for 1 pound propane canisters and offer to pay up to $1 each for them. When you refill them the first time, your total cost will be $1.60, about half the price of new. Since the valves in these canisters are designed for a one-time use, though they will usually support many refills, they will eventually wear out. So, you want plenty of spares in your stockpile. I have about a dozen and want a couple of dozen more.)
Yet another place to look for old propane tanks is at your local metal recycler, who often sorts out re-sellable items from the general scrap and keeps them off to one side for customer purchase. The scrap yard near my house has a pile of about 50 used propane tanks and will be happy to sell them to me for 20 cents a pound, or about $3.80 each, which is still a huge savings over a new one for $25.
Part Two – Coming Up Next
This ends Part One of “Prepper Propane 101,” which mostly covered the what’s and why’s. In Part Two, we’ll get into the how’s and learn how to refill small green one pound canisters from bulk tanks, for a tiny fraction of the cost of new. This refilling can get a little complicated when you’re trying for a full fill, but it needn’t be if you understand what you’re doing. We’ll also go over some of the basic propane appliances that you should add to your resources.
THE FINAL WORD
It goes without saying that learning how to safely use propane is a good idea.  Campers, RV’ers, boaters and off-grid homesteaders are already familiar with propane but for many city dwellers, the gas BBQ represents the extent of their experience with propane gas.

Monday, May 13, 2013

Two X Class Solar Flares

Two X class solar flares (now 3), both rated about X3 on a scale of 1-10 may cause some communications outages today and for the next couple of days.  Solar flares are scaled  C1-10, M1-10 and the highest X1-10.  It hasn't been proven but there are some who believe that major earthquakes are triggered within a couple of days of the occurrence of an X class flare.

You can see just how much solar weather, and magnetic flux we may experience based on those scales.  We are on the highest level, however we are on the lower end of that.  Most  Solar Flares are closer to C-9 to M-5.

Satellites are the most susceptible to this type and strength of radiation, but Ham radio HF frequencies may also be interfered with due to the thickening of the Ionosphere causing radical skip patterns.  This is one of the reasons that CB radios and to a small extent ham radios do not do too well in the summer months.  When the Ionosphere thickens......Skip becomes almost unbearable for local AM (CB) communications.  However VHF/UHF ham radios using FM mode do not see much if any interference or degradation in signal reception.

Friday, April 5, 2013

Where Do I Go: Areas of the US to Avoid

As the potential for a globally destabilizing event becomes ever more probable, many concerned Americans are starting to wonder where they’d go if the worst were to happen.
To help answer that question, we can start by identifying the areas of the country to avoid.
The following map of the United States takes into account all of the gun related deaths since the Sandy Hook school shooting. You’ll likely notice that there is one common denominator. The majority of the violence has occurred in major metropolitan areas, with some incidents spreading into outlying ex-urban and rural areas. As of this writing 2,244 people have been killed since December of 2012.
If this is the state of our nation during relative peacetime and perceived prosperity, imagine what it’ll look like in the midst of financial, economic or political turmoil.
Americans living east of the Mississippi River will likely experience the brunt of it. But anyone residing in and around any major U.S. city will, likewise, have a tough road ahead of them.
If you live in one of these red zones, you’d better plan accordingly:
Mapping the Dead
As you may have guessed, the overwhelming factor in determining your chances of survival during a wide-scale regional or national emergency will be population density, a topic that has been extensively covered by Strategic Relocation specialist Joel Skousen:
…every crisis that threatens, even a local crisis, can turn exponential because of close proximity to people who cannot help themselves. Even good people panic in a crisis…
Wherever we find large groups of people, when crisis strikes we will also find the worst that mankind has to offer – rioting, looting, starvation and violence.
Survival expert James Rawles refers to them as the golden horde; the thousands of people who will be desperate for supplies, shelter and safety in the aftermath of a major catastrophe:
…there is just a thin veneer of civilization on our society. What is underneath is not pretty, and it does take much to peel away that veneer. You take your average urbanite or suburbanite and get him excessively cold, wet, tired, hungry and/or thirsty and take away his television, beer, drugs, and other pacifiers, and you will soon seen the savage within. It is like peeling the skin of an onion—remove a couple of layers and it gets very smelly. (Survival Blog)
Given the probability of the United States succumbing to any number of devastating catastrophes that may include an economic collapse, food shortages, pandemicregional earthquakessolar storms, or war, there is ample motivation for those with the means to do so to get out of densely populated areas of the country. Likewise, living in locales with close proximity to major thoroughfares such as interstate highway systems could pose a danger as the ‘horde’ evacuates disaster-struck areas.
For many, relocation is not possible because of job requirements or other factors. Thus, those of us who are left with no choice but to remain in populated urban or sub-urban areas, it is strongly recommended that you consider preparedness planning for staying put, or bugging in, during an emergency. It’s not the ideal scenario, but if you plan on hunkering down then you may find it advantageous to have food stores and other long-term supplies, as well as home defense plans. And, should things get so bad that you have to leave your primary residence, be sure to have evacuation plans in place.
The U.S. government is actively preparing to deal with the aftermath of many of the possible crises cited above, namely the civil unrest that will follow. Police and military units are training to deal specifically with urban scenarios because emergency services planners understand that America’s metropolitan death zones will be completely devoid of law & order.
If you’re in one of these areas, and plan on staying during a major crisis, take steps now to prepare for the inevitability of mass chaos.

 Mac Slavo
April 4th, 2013
SHTFplan.com

Thursday, March 21, 2013

Old Post Reminder of Mask Requirements for Pandemic

27 Apr 2009 /
http://www.utahpreppers.com/2009/04/...aredness-info/ Family Preparedness, Pandemic Preparedness, Personal Preparedness
Since my post from yesterday regarding Pandemic Preparedness in light of the current Swine Flu outbreak, I’ve talked to several other preppers and want to provide our readers with more information. Specifically I want to share some other/better mask information, some great links for info on the virus spreading and to discuss sheltering in/quarantine a bit more.
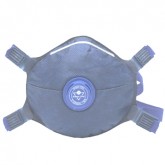
First, to masks. I previously recommended that everyone have several N95 masks in their preps. Having talked with several prepping experts today including a couple who sell masks, I have some additional recommendations for you.
N95 Masks

First, the consensus is still that N95 masks are completely satisfactory to have in your preps. The main issues with N95 Masks are regarding donning the mask. Several points were made to me about this today. First, when you don the mask, you MUST make sure that there is a good seal of the mask to your face. This usually means adjusting the nose bridge so that it fits properly on your face. If you don’t have a good seal then the mask is useless to you. Second, make SURE that your hands are clean and sanitized before you handle the mask. If you have the virus on your hands and then touch the inside of your mask to put it on, you’re just putting the virus right in your airway. Finally, and this is something we learned some time ago, for children - you can cut the bottom of the adult N95 mask off to custom fit it to your child’s face. This is actually what my wife and I were taught to do by the Oncologists for our daughter with Leukemia. You can order N95 masks from this link (or lots of other places as well).
N99 Masks

N99 masks are more expensive than N95 masks. They do a slightly better job of killing viruses and (from what I’ve learned today) they tend to adjust and fit better on your face. The picture above is of someone wearing an N99 mask. You can order N99 masks from this link (or lots of other places as well).
Triosyn T-5000-V Respirator Mask

The Triosyn mask is a much more expensive solution but is a proactive approach. They have an antimicrobial protection system built into them, are fluid resistant, have an activated carbon layer to filter out odors and a one way valve ventilation system. The ventilation system makes it easier to wear for extended periods of time because it is much easier to exhale from. It also has an inner seal along with two adjustable head straps and an adjustable nose piece. It has about a 5 year shelf life and is good for 24 hours of use. It is one of the only masks that actually kills viruses instead of just filtering them out. You can order them through this link (or lots of other palces as well).
Panic Buying

The panic buying has already started. Here in Utah, many stores are already out of them. I went by a couple stores today and they were sold out, while I was at Wal-Mart looking 3 other people came to where I was looking for masks. Many online vendors (including the ones I’ve talked to today) are reporting that they have had a HUGE demand the last couple days and are sold out.
They also said that they fully expect to be re-stocked within the next 48 hours. Masks are the new ammunition - they’re going to be pretty tough to find before too long! With all the links above, I would do what I could to find out from a site whether they had masks in stock before I placed an order with them.
Masks in General

Let’s put all this in perspective. What do you need masks for anyway? There a only a couple COMMON times you’ll need them during a Pandemic:
  • In Public
    • Anytime you are out in public during an actual pandemic/epidemic (which point we are NOT to yet!) you will want to be wearing a mask, eye protection and possibly gloves. You’ll also want to be armed with sanitizing spray and wash.
  • Initial Quarantine
    • If you start an in home quarantine then you will want everyone to wear masks and take serious protective precautions for the first 48 hours. This is to identify whether anyone in the quarantine is already infected and is going to come down sick. Once you’ve determined that nobody in the quarantine is a carrier you should be safe to un-mask but should still maintain very sanitary practices.
  • Around someone sick
    • If you have to work around someone who is sick (i.e. a member of your quarintine contracts the virus - like your child) you will want to take multiple precautions. Isolate the person in a seperate room, hang heavy plastic over the doorway to prevent active airflow, don protective gear including mask, goggle, gloves, apron, shoe covers anytime you must enter the room.
Again, these are the most common times you’ll need a mask. If you live in an area that has had a breakout, I would wear a mask anytime I was out in public. If you initiate a quarantine, once you’ve gone through the first 48 hours you should be fine in your home without a mask and even outside - as long as you are not near other people. My perspective is kind of skewed since I live in the country - there are very few people here. If I quarantine I fully expect I’ll be out working on my garden most of the time.

Generally speaking, little kids DO NOT like to wear masks! (we have some personal experience with this) I would advise you to tell your kids that you’re going to teach them about some current events and some plans in case certain things happen. Have them wear a mask while you’re talking, make it last about an hour. Have a fantastic dessert for them if they keep their mask on. Then do it for half an hour each day for the next five days. By this point they won’t freak out about the mask, they won’t fight it quite as much.
Sanitizing

Anytime you’ve handled something that might have exposed your hands to the virus, you should vigorously scrub your hands - preferably with anti-bacterial soap. You should be using an alcohol based sanitizer pretty much anytime you handle something that might have been exposed - door handles, paper, hand rails - anything someone might have sneezed on or touched after sneezing. Again, this is only if you are in an at-risk situation like a breakout in your state.

Other ways you can sanitize are to get spritzer spray bottles and fill one with isopropyll alcohol and another with bleach. Spraying things like door handles with either or both of these will kill most germs.
Utah status

Since we’re a Utah blog we’ll discuss the status of the outbreak in Utah. As of now, Utah has not had any reported cases of the Swine Flu. The state CDC directors and other government officials have met to review Utah’s action plan should cases be found here. They stress that currently Utah is in an “emergency PREPAREDNESS” stage, not an actual Emergency stage. As of now, no schools have been closed or are planning to close. They do advise the following though:
They’re asking people with respiratory symptoms to stay at home but to go to a doctor if they have the serious hallmarks of flu — like a fever, muscle aches, exhaustion, chills, sweats and headaches –not just a cold.

“Well, I think you have to use common sense. You know we’re subject to colds, to respiratory illnesses all the time. I think though, if I were running a fever, had muscle aches and felt unusually tired along with a respiratory illness, yeah, I’d go to the doctor,” Dr. Sundwall said.
World Status

As of right now in the U.S. NOBODY has died from the virus. Many have come down with it but they’re being reported as “mild cases”. However, as of right now 103 people have died in Mexico from the swine flu.
There is so much going on with this worldwide that any status would be outdated as soon as I posted it. There are a few good resources to check out though.
Don’t Panic, Just Prepare!

There seems to be a lot of fear out there about this, the news seems to be feeding that fear. The information in the last section of this post could be scary. But we need not panic! We’re Preppers, we look to things like this as stuff we thought might happen! The purpose of this post is NOT to scare you. It’s merely to help you get prepared for what might come. We’re trying to provide you with information so that you don’t have to be scared.

The prudent thing to do right now is review your preps - make sure you’re ready for an extended stay at home. If you have to self-quarantine at home, are you ready to be there for a while? What if this virus mutates and turns into a pandemic? Are you prepped for the grid to go down? Are you prepped for other services to be interrupted? Take inventory, make sure your 3 month supply is fully stocked. Make sure you have fuel, food, water and pandemic preps. Have a family action plan in case there is a breakout in your area.

Always, always remember: If you are prepared, you SHALL NOT FEAR! As Preppers we’re ready for this - whether it happens or not.

Disclaimer

FAIR USE NOTICE: This site contains copyrighted material the use of which has not always been specifically authorized by the copyright owner. We are making such material available in our efforts to advance understanding of issues regarding health, safety, financial trends, and anything having to do with current and future political, social events etc. We believe this constitutes a 'fair use' of any such copyrighted material as provided for in section 107 of the US Copyright Law. In accordance with Title 17 U.S.C. Section 107, the material on this site is distributed without profit to those who have expressed a prior interest in receiving the included information for research and educational purposes. Notwithstanding the provisions of sections 106 and 106A, the fair use of a copyrighted work, including such use by reproduction in copies or phonorecords or by any other means specified by that section, for purposes such as criticism, comment, news reporting, teaching (including multiple copies for classroom use), scholarship, or research, is not an infringement of copyright. In determining whether the use made of a work in any particular case is a fair use the factors to be considered shall include—

(1) the purpose and character of the use, including whether such use is of a commercial nature or is for nonprofit educational purposes;

(2) the nature of the copyrighted work;

(3) the amount and substantiality of the portion used in relation to the copyrighted work as a whole; and

(4) the effect of the use upon the potential market for or value of the copyrighted work.

The fact that a work is unpublished shall not itself bar a finding of fair use if such finding is made upon consideration of all the above factors.